Monday, March 28, 2016

Thirsty Llama at Cotopaxi – A Scratch Project


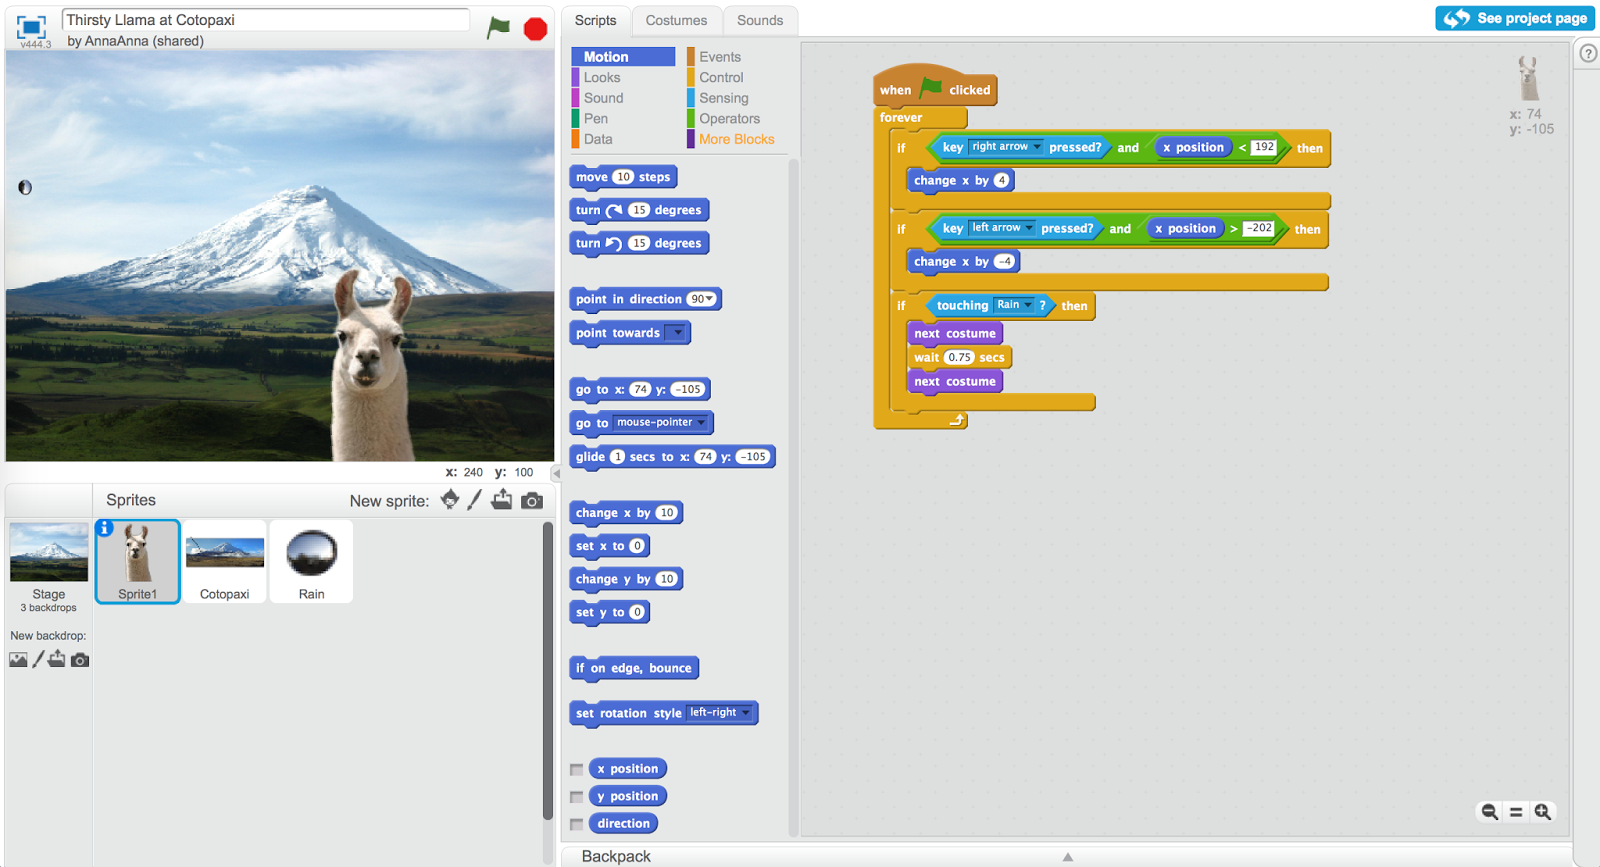
To start, click on the green flag. Then move the Llama with the left and right arrow keyboard keys. When the Llama touches a raindrop there is a popping sound and the Llama smiles. Unfortunately, the Llama is picky and does not smile at each rain drop.

After opening the Scratch community website, logging into my account, and starting to ponder about which project to make, one particular project instantly caught my eye. It was called Hot Air (a game) and it was listed in the "featured project" section on the front page, center screen. Hot Air showed a green island in blue water with a hovering hot-air balloon. The simplicity and clarity of the graphics, clearly contrasting other featured projects, pulled me in. I clicked on it and tried it out. Underscoring its graphical clarity, the project also had simple and straight forward inter-actions. Up, down, left, right keyboard arrows moved the hot-air balloon, and the aim of the project was to avoid seagulls that entered the screen from the left and right side. There were also two numbers on the screen. A counter kept track of the seconds I managed the "stay alive", and a fixed number seemed to indicate the longest amount of time anyone every managed to "stay alive".


What further attracted me about Hot Air were the enthusiastic notes the creator left in the comments section, for example: "22/3/2016 FEATURED 2nd time!!! I won't be able to reply to most of your comments. DON'T ADVERTISE!!!!" The note communicated the excitement of the creators of being highlighted, their felt responsibility to connect with anyone who reached out to them, and a realization as well as apology for not being able to meet all requests for the creators' time. By writing "don't advertise" the creator seems to asked people to refrain from further sharing. And the comment seems to imply that the curator is of the impression that the felt added responsibility is a result of the project being featured.

The enthusiasm connected with responsibility to the other Scratchers paired with the simplicity of the design was fascinating to me, so I decided to try to make my own project inspired by this project. Since I am not an experienced Scratcher, I wanted my first shared project build up from the bottom, rather than remixing existing projects.


The code of Hot Air next to the code of my project.

The island looked much like a mountain, and I remembered my recent visit to Ecuador. During my first visit to Quito, one of the surprises I experienced was that a volcano was visible from the city. The Cotopaxi is an active volcano located close to Quito, the capital of Ecuador, and is part of the Pacific Ring of Fire. This experience inspired me to use a photograph of the Cotopaxi as backdrop for my Scratch project. I decided to replace the hot-air balloon with a Llama, mainly because Llamas are likely to live close to the Cotopaxi, and because they are friendly animals. My plan was an elaborate project in which the Llama would change its looks when hit by a rain drop and after being hit 3 times the game would be over, much like the Hot Air project. However, the coding of the project was more challenging that I imagined. Especially after seeing the code of the Hot Air project, which made use of many variables and even its own built blocks, I decided to simplify.

The popping sounds I added to the Llama when touching a raindrop changed the entire narrative of the project. It was such a satisfying sound, that I decided to give the Llama a grateful expression when it touched the raindrop. Changing the costume introduced a bug into the software. While a popping sound is produced every time the raindrop touches the Llama, the Llama does not change its appearance every time. I tried to resolve the bug by going through some of the tutorials that were conveniently available on the left of the screen. Eventually, I gave up on trying to fix it and changed the narrative of the project to feature a picky Llama that is not satisfied by every raindrop.

While working on the project, the way in which the active community, the featured projects feature, the see inside feature, and the tutorials came together and informed the development of my project was fascinating. Exploring the grammar of the language itself made me think of the many different ways I could have continued to expand the project. The community features helped me get inspired and generate idea for getting started and to persevere. The tutorials helped me get unstuck. While everything was mostly easy to get to, I created my own drawing board or pallet and through-lines on the site that I was at times challenging to keep present, e.g., opening up several tabs of the Hot Air project to be able to flip through codes more quickly, or opening up the tutorials in one tab while working on another. This made my wonder what an analysis of the intra-actions between Scratchers and the Scratch website might tell us about aspects of the sites to further expand the rich learning opportunities of the community.

Sunday, March 20, 2016

Wind-up Toy Hack


Taking apart toy, exploring their inner workings, and remixing different kind of characters using scissors, tape, screwdrivers, and thread can disturbingly destructive while being at the same time satisfyingly creative. During this week's activity, we were asked to hack a toy in the context of the constructivist idea of evocative objects. Turkle (2007) describes evocative objects as those everyday materials that bring together practice and thinking. Through the doing with an objects new ways of thinking about the world can emerge in action. Through interactions with these materials, often surprisingly mundane objects, the materials can ground deep understanding about knowing and being in everyday practice and in this way teach us about ourselves (Turkle, 2007).


While I brought a few toys to class with me, I was most drawn to a plastic round character of a mummy. Turning a knob in the back of the mummy made it waddle forward. Maybe a character from a television program, this figure seems to have the power to inspire playful stories and adventures when brought together with other play-things. An evocative object? It seemed like it was made for adventurous storytellers, easy to get started and potentially leading to complex plots.


To get to its inner workings, I carefully observed how it might have been constructed. There was a crease that indicated that two pieces of molded plastic were put together - the mummy's front and back side. There were holes where the legs could stick out, having enough room to waddle. In the back of the mummy, a small button was positioned to wind-up the toy. The screws that held the body together were not common, and I had to find a special shape to unscrew the little guy. To my surprise, the two molds of the body did not fall open once the screws were out. The plastic firmly stayed in place. It seemed responsible, given the target age for the toy, however, less convenient for my purposes. The careful deconstruction was over, and I started pecking away plastic with a wire stripper. The plastic, bent away with little effort and as I slowly made my way along the crease that held the mummy together I lost connection to the mummy and started feeling more interest towards the gear based mechanical motor inside of the plastic mold. It was the material that blew movement into the character for me, the material that made it waddle. It was perhaps something I could use to create something else, something bigger, something fun.

In the design of powerful objects that are created in an attempt to call out these kind of entanglements between people and objects, Resnick and Silverman (2005) present ten design principles based on their experiences of designing construction kits for children. One that particularly resonated with me while engaged with the mummy, was Resnick and Silverman's (2005) design principle Choose Black Boxes Carefully that explains a way of selecting the materials and components that are part of a construction kit for children. Similar to the idea of evocative objects, Resnick and Silverman (2005) argue that materials invite children to explore ideas that can be far reaching and ways to understand the world. Ideas are entangled with materials and they can become graspable through the active engagement with materials. Hence, the choice of kind and form of materials inside of a construction kit can have implications on the kinds of ideas that unravel in play. The idea of black box references a certain transparency of the construction kit materials, asking the designer's to responsibly consider how easy it it to explore the bits and pieces or inner-workings of a toy or parts of a toy.


It was not easy to get to the mechanical machine, and the desingers of the toy likely did not consider this as part of the play-activity of the storytellers they might have designed for. Once the opening in the mold was large enough, I used the wire stripper to prop open the mold even further. I reached into the mummy with my hands, and, careful not to break it, I pulled out the wind-up motor. It was a white, rectangular box with a handle to wind up the gears on one side, and a flat circle that had translated the motion of the gears to the legs. On the thin sides of the box, there were holds that revealed the gears inside. Repeatedly I would up the gears to observe how they worked. It was quite fascinating to watch, and I discovered that the flat circle was not centered, which seemed to have caused the waddling effect. I placed different objects, including a 3d printed sphere, on top of the moving flat circle to see how this combination might behave. The exploration inspired me to think about different sets of adapters that could be part of a construction kit along with the wind up motor for children to create their own imaginative waddling characters and to explore the motion in relation to position and shape of materials – I hope that I will find time to continue exploring this idea!  

References 
Resnick, M., & Silverman, B. (2005, June). Some Reflections on Designing Construction Kits for Kids. In Proceedings of the 2005 Conference on Interaction Design and Children (pp. 117-122). ACM.

Turkle, Sherry. "Introduction: The things that matter." Evocative objects: things we think with (2007): 3-10.


Sunday, March 6, 2016

Tinkering with a Motor


Timelaps video of my Scribble Bot

Crafting this slow moving Scribble Bot was an exploration of materials and motion. Immediately drawn to the shiny solver tin, I selected tape and paper materials that would match with the silver color nicely. Getting the motor to run without the additional materials was easy, add on lead to the positive side of the battery and the other lead to the negative side of the battery. Depending on which lead you add where, the motor spins in a different direction. For my purposes, it did not matter in which direction the motor would spin.

The tip of the motor started rotating, giving me immediate feedback that what I had done was correct. Although I made motors spin many times before, I felt somewhat gratified. The technology told me I was treating it like it should. My approach to creating the rest of the Scribble Bot was through tinkering with the materials I selected. 

Tinkering is a playful, experimental, iterative, and bottom up way of learning. Tinkering can foster important ways for children to grow and educate their creativity and agility in preparation to recognize and make disappear future challenges adults cannot anticipate while educating children (Resnick & Rosenbaum, 2013). When thinking about designing contexts for tinkerability, Resnick & Rosenbaum (2013) reflected on 6 key aspects: emphasizing process over product, setting themes not challenges, highlighting diverse examples, tinkering with space, encouraging engagement with people not just material, combining diving in with stepping back.

While for me, these aspects seemed to have played a role in how I approached the design of the Scribble Bot, it is challenging to cleanly differentiate one aspect from another. Nevertheless, I am exploring my Scribble Bot building activity through these aspects to better understand the overlaps.

Emphasizing process over product – Form the beginning I knew that this Scribble Bot is going to have to use a motor and that it should move. Since there was a clear goal to the task, I tried to focus my explorations on the process of getting there. In the beginning I took notes, made scribbles, and even took pictures of the kinds of speed-bumps I encountered, e.g., avoiding short circuits when battery and tin can touch, or balancing the tin can so that the motor could spin a pipe cleaner. However, these challenges, while seeming to slow down my process overall, seemed to drive my project forward and into the shape it ended up being.

Setting themes not challenges – The activity was framed as an exploratory task. Although the task of creating a self-moving Scribble Bot was in the back of my mind, working with discarded and everyday maker materials seemed to help lower the feeling of having to get it down. There were so many different ways of getting it down, the theme of self-moving creature was open ended for anyone to interpret. 

Highlighting diverse examples & encouraging engagement with people not just material We started creating the Scribble Bots together at the Make Innovate Learn Lab (see also my site description   and 360° pictures of the MILL Makerspace). Everyone had their own approach. One person made the tip of the motor touch the table for the Scribble Bot to rapidly spin in circles, another person attached a string and a pen to the tip of the motor and let it dangle over a piece of paper to create abstract looking imagery. Seeing everyone's approaches unfold alongside my own was encouraging and helpful. While at first I did not know how to translate the motor's motion to the tin, I learned from watching and interacting with others how to unbalance the motor (in theory). It required some trickery, watching other projects, and talking with others to make it work.

Tinkering with space – Creating the Scribble Bot required some trickery, watching other projects, and talking with others to make it work. The material arrangement on the table supported the seeing of other projects and interacting with people. For example, the hot-glue gun was positioned at the opposite end of the table. To attach the popsicle sticks to my tin, I walked over and saw another person's project in action. The goodly eyes another person had left on the table invited me to attach eyes to my Scribble Bot. 

Combining diving in with stepping back – I could not finish my robot at the Make Innovate Learn Lab, and planned to continue working with it another day from my office. Revisiting the project after a few days, I turned it on and did not see the tin moving at all. After watching it for some time, I noticed that it was moving - just very slowly. I took a timelapse video (see above) to capture the Scribble Bot's slow motion. 

References


Saturday, February 27, 2016

3D printing: what a short step-by-step workshop taught me

The perhaps world flattest toothpaste tube.
Even as a more experienced maker, exploring the Make Innovate Learn Lab (MILL) at the IU School of Education I sometimes feel similar sentiments that Paulo Blikstein discussed in his forthcoming Makeology chapter. He reflects on the feeling of being overwhelmed with possibilities, and the need for people to be given a way into making, be it through facilitation of activities, guided group work, or materials that invite exploration. Throwing oneself out there and stepping outside of one's comfort-zone is hard, and it can be especially hard when there are people around who know so much about the technologies available in the makerspace.

For me this is the case for 3D printing. Recently, I have been thinking a lot about 3D printer set-ups through the analysis of the spatial-material arrangement of a youth-serving makerspace. However, I never made a 3D print of something that I would take home and keep myself. So, I decided to step up and print something!

Small entry activities, such as 3D printing a gadget, can help get people to start imagining the possibilities that a conversation with makerspace tools and materials would have to offer. Often these are short, instruction heavy workshops, in which participants create pre-determined projects with little opportunities for derivation. It seems like a stretch to consider the making of a keychain in a 30-minute workshop as an example of making as a way of becoming more closely connected to one's humanity or to foster communal change (Blickstein, 2016). For some makerspaces, this might be the only way to foster making, such as those spaces with large amount of visitors that are not likely to return frequently. What are the advantages of these discrete moments?

I was hoping to find out while making a 3D printed trinket myself, a came up with steps and followed them:
  • Selecting a model to print
  • Setting up the software
  • Pressing print
  • Waiting
  • Taking my print home
Selecting a Model to Print

The toothpaste squeezer model I selected to print
Online people shared models of brightly colored egg cups, cable holders, smartphone stands and cases, key holders, and whistles. There was so much to make, and settling on one quick thing was a challenge I solved by asking others. Pointing at the picture of a simple toothpaste squeezer, one of my class mates said "I have this at home, and use it." I downloaded the model from Thingiverse. Ready to print. The interactions with others, online and offline, helped me make sense of some of the possibilities and how my 3D printing activity could be sensible.

Setting Up the Software


I did not set up the software. Instead, I got a 3D printing mini-lesson from Justin, the MILL makerspace mentor and my friend. Things I learned included that the model needs to run through a slicer because the 3D printer prints in layers, stacking coating on top of coating until the final artifact is there. Flat things like the one I was about to print do not need support structures. Tall and complicated models, such as the coral reef model that is sitting on the MILL window sill, do need support structures that can be pulled off the finish model once the print is complete. A brim, a very thin flat surface for sticking to the class, is needed so that the model is not being dragged across the surface. Useful stuff! The models Justin pulled up while explaining made these concepts tangible. Holding the models close, I could see the layers of the prints that were made at higher speed. 

Pressing Print

Once the SD card was plugged into the printer and we pushed go, the printer chirped and then got quiet. It was warming up. Suddenly, it started moving radiating alternating high and low-pitch tech buzz into the room. The predicted printing time was two hours, and I stuck around for the entire time to see the object slowly grow, listening to the rhythmic back and forth unfolding on the glass plane.

Waiting


Slow slows slow, then fast fast fast then slloooooow – The gears of the printer steadily rotated, complexly holding the filament dispenser in place, moving it back and forth in computational presicition. When covering the hollow shape, the printer made little steps, accellerating in the sounds before slowing back down, making a low mechanical stopping sound when reaching an edge. It also circulated all the way around the rounded edge triangle that was my model, accommodating this movement with what sounded like softly spinning a turn-table. Perhaps not a beat to dance to, creating the 3D print was a noisy endeavour that expanded across the room. When culmulating in it's final squeek, I wonder whether the space might need some sound insolation. 

The finished print on the 3D printer.
The self-inflicted step-by-step creation of a 3D print may not be a great comparison to an instruction-heavy workshop facilitated in some makerspaces, but it did give me the change to get somewhat of an idea of learning under constrained conditions in spaces that could offer so much more. For example, watching the print grow and listening to the 3D printer sounds brought up ideas for improving the MILL and made me reflect on the odd noises that can be lost once the technology becomes obsolete, such as the sound of dial-up internet (not dissimilar to the 3D printer sound I heard). With this experience in my repertoire and the 3D print hanging out in my living space, I wonder in which kind of situations it will become a useful experience to draw upon: perhaps bringing up in conversation, perhaps teaching someone about 3D printing.

Connected Learning principles, such as production centered learning as stretched across different learning environments (Ito et al., 2012) could help devise ways for capturing the potentially rippling effects these kind of learning experiences might have. What if we would know more about where the learning about 3D printing might go. Are the practices transposed to other materials or learning spaces? Do they give rise to more in depth projects in other learning environments and what are productive ways to support this during 30-minute workshops? Giving the projects away to family friends or leaving them in one's living spaces for anyone to see, what do 3D printed gifts spark in recipients? If anything, it seems productive to engage in explorations of short instructional workshops from a research perspective. I am all excited to explore some of these questions!

Monday, February 22, 2016

Connected Learning while Re-Crafting Math


After long days at the school, I like to browse Pinterest for fun craft projects and to get inspired about what I could make if only I had more time. Perhaps an indicator for having a healthy attitude towards the future, the many pins and re-pins on the pictures in the app tell me that there are probably many people like me out there. A resource to tap into were I to commit.

I am a graduate research assistant at the Creativity Labs, where we strive to design for powerful ideas keeping in mind tools and materials for more equitable learning environments. One of the projects I had the chance to work on is the Re-Crafting Math project, which explores the implicit and explicit mathematics and STEM related concepts tangled into traditional female fiber arts practices. We are exploring this through embedded ethnography, e.g., joining a crafting group and learning along with its members, and interviews of experienced crafters. In the office, there is usually someone talking about the complexities of knitting, sewing, crocheting, or weaving at some point every day. Fiber, threads, fabric, needles, and pins have become an important part of our academic and professional culture. 

To really get going on the Re-Crafting project, I had to find my own fiber craft. Initially stretching it towards the harvesting of fiber for basket making, a craft in which I experienced a strong pushback between crafter and material, I settled on fabric manipulation. Fabric manipulation is the craft of folding, sewing, assembling, and pulling fabric into three dimensional and layered shapes (see pictures above). A sub-category of fabric manipulation is origami quilting, in which the crafter folds fabric similarly to paper origami and sews the folds on to batting, the insulating material, and backing material. 

By diving into this craft, I could combine my interests in lines, folds, and clear cuts with my interest to start a particular craft that could contribute to the project. It is at the intersection of these three areas, (1) the interests, (2) academic, and (3) peer culture, where Connected Learning is theorized to happen. Addressing divides between in-school and out-of-school learning, income equity, and generation, Connected Learning is ties together production-centered, openly networked, purposeful creativity with interest and peer driven learning. Sharing productions and insights with local communities as well as with the broader public is an important locus of Connected Learning. Learning outcomes relate to individuals as well as to the collective or society. (Ito et al., 2013)

While personal interests, academic/professional culture, and peer learning seem come together in my fabric manipulation journey, I wondered what, if not all, could be considered Connected Learning?

When I found the Fabric Manipulation pictures on Pinterest, I was surprised by the versatility of fabric and the beauty of the shapes people had created. At first glance, one can imagine how the techniques could be embedded in fashion or quilting projects. Undecided how to move forward in relation to a larger contextual frame, I decided to explore some of the techniques by following tutorials that Pinterest linked to. 


The windy, rainy days of winter break 2015/2016 were my chance to get started. Having had dreadful memories of breaking the machine in the past, I was lucky to get started at home in Germany where my mother, once again, could teach me to use the sewing machine. Together, we converted the inches into centimeters and got set up after ironing a pillow cover that used to belong to my grandmother and cutting it into pieces. With the smell of steamed old linen in the air we got started sewing. It felt great to engage in this intergenerational experience through a tangible and production-centered project that could be useful for my academic work as well.


Most of the complex mathematical thinking happened during preparation and sewing the projects. For example, we discovered that many of the techniques were not straight forward and problems needed to be recognized and set up first. This was especially true for the projects that involved tucks, because the overall fabric size needed to be calculated in relation to tuck size and final project size. Implicitly understanding those mathematics concepts that could be written into equations, we often moved forward by inventing short-cuts. For example, to center the tucks we folded the fabric rather than calculating and measuring distances. 

Smocking mathematics in Puerto Rico
After leaving Germany, I continued my crafting during a pit-stop at the San Juan beach and later at home in Bloomington. When I paused to actively think about the mathematics concepts involved in the different fabric manipulation projects involved, the list kept growing, including basics, such as addition, multiplication, and measuring to more challenging mathematics, such as coordinate geometry, trigonometry, and quadratic functions. I noticed that when showing my projects to people, I traced lines, folds, and curves at specific parts of the project to point out mathematical concepts and mistakes I made when calculating or short-cutting the projects. I started calling my fabric manipulations mathematical proofs, and started to explore the tactile and auditory interactions of the spatial manipulations.


Thinking about how to bring Fabric Manipulation to the classrooms, many ideas came to mine, mostly cycling around a gallery walk that displayed my mathematical proofs, unicolored as they are, as suggestions to move forward. It was only after I met with the former president of the local Quilters' Guild that the idea of an instructional book was tossed around. We imagined the actual fabric projects being pasted on one side with the mathematics concepts listed on the other – the viewer could to literally grasp the mathematics. We also came up with a few  example projects that could be illustrated to present the versatility of individual techniques. These examples could reach from using different colored fabrics to useful projects such as ornamented pillows or bags. 

The connected journey, stretching across international waters, generations, and academic, professional, and peer cultures is a continuously growing learning experience. With each step new possibilities emerge with decisions awaiting to be made. Following my interests in the production of projects and the types of connections I make is my campus along the way. As I continue to explore these project examples, I am excited to discover new pathways into STEM learning together with other crafters. Next stop, the Indiana Heritage Quilt Show!

References
Ito, M., Gutiérrez, K., Livingstone, S., Penuel, B., Rhodes, J., Salen, K., Schor, J., Sefton-Green, J., & Watkins, S. C. (2013). Connected learning: An agenda for research and design. Digital Media and Learning Research Hub.

Sunday, February 14, 2016

Reading Glassie's Folk Housing in Middle Virginia using Fröbel's Kindergarten Gift

This week, two classes I am taking this semester converged in interesting ways. In Constructionism our task was to explore one of Fröbel's gifts. My gift was number 6, a square shaped box containing wooden blocks that can be explored through various spatial and pattern arrangments. Gift 6 is an extension of Gift 4 and 5, which all represent simple play things that are intended to foster a child's creativity. The solid parts teach relativity, metamorphosis, and unity: as the child assembles different shapes out of the parts, she notices that various formations can be created our of the same building blocks (Brosterman, 1997).

For my Material Culture course we are reading one book each week. This week, we read Henry Glassie's work on Folk Housing in Middle Virginia, in which he is presenting a structural analysis of architectural structures. In short, Glassie is drawing on semiotics and a language metaphor for the study of materials by suggesting that there is a certain grammar that underlies the architectural competence of the builders. In his analysis Glassie presented specific rule for building deduced from close observations. The rules are detailed and it is at times challenging to imagine the way they represent themselves in buildings and how some rules seem to be presented as dependent one others or necessarily have other rules follow them.

To better understand Glassie's structural analysis, I used Fröbel's Gift 6 as a way to layout the rules on my kitchen table. By making the rules visible and tangible, I was able to better connect to Glassie's analysis. Here is a picture essay that lays out the main rules using the building blocks in Fröbel's gift 6:
I laid out an approximation of the scale of the basic shapes.
I used base shape "X" to start my structure. To extend my base shape built up in 3 dimensions by treading the shape equally, meaning that I did not change the base shape as I built upwards. 
 I explored rules of massing and piercing, by adding windows to my 1 story tall structure
Here a backward expansion is shown, to illustrate the way the structure would be pierces to create an opening between the first and second base shape. 
I added roofing onto the shape in order to further extend upwards.

This is the final presentation of the rules combined. 

Lastly, I tried to construct a Type 1 house with the building blocks of Fröbel's Gift 6. It was actually quite complicated to construct the house with the materials available, and I had to employ mathematical reasoning related to geometry and fractions to make this simple structure.

This exploration helped me appreciate the value of the gifts in a practical way beyond early childhood education. The shapes themselves made it possible for me to approach complex analysis of a field that I am new to in more concrete ways. I think that it would be wonderful to include more concrete, yet simple tools like the Fröbel's gifts throughout educations rather than only during Kindergarten and doctoral studies. 


Saturday, February 6, 2016

Making a Paper Circuit


This is the paper circuit I made at the IU School of Education MILL Makerspace during the Constructionism course last week. It was a super quick exploration. Among 3D printed figures, LED lights, conductive tape (copper and silver), and coin-cell batteries, colorful index cards were laying on the table, ready to be used. I was standing close to the index cards and their colors seemed fun to work with. I picked them up and started to shift them around. 

Recently, I have been exploring fabric manipulation techniques and the kinds of implicit and explicit mathematics concepts embedded in different techniques. One of my favorite shapes of the origami structures I created is the pinwheel. So, I started out my paper explorations with the basic shapes of this design and the idea to create a pattern that integrates the circuit materials (i.e., conductive tape, LED, and coin-cell battery) to be minimally visible as possible, and that the interactions with the circuit (i.e., the switch) would be integrated in the pinwheel design. 

Although I've made circuits of different materials and level of complexities before, the projects I set out within the minimal constraints of the instructions that were provided was much more complex than I had anticipated. On a small and super fast scale I experienced the kind of playful and imaginative spiraling process that youth at the computer clubhouses are theorized to experience (Rusk, Resnick, & Cooke, 2009). The quick project had me thinking about shapes, angles, and dimensional constructions long after leaving the makerspace, and here are some of things that stood out to me in hindsight:

  • Similar to Papert and Harel's (1991) description of the painter-programmer who was guided by colors and shapes in how meaning was constructed, I listened to the paper structure and let it guide my placement of the circuit and conductive tape. The material itself was sturdy enough to keep in place, while flexible enough to allow me to wind the LED and the conductive tape through the construction. While I started with an idea, I did not know how I would eventually get to the final design. The folded paper and the way I arranged the pieces helped guide the way the tape was placed (e.g., when to have the tape on the front or back side) and where to position the switch (e.g., on one of the folded corners). It was interesting to see all aspects of the design interconnecting in the process of making. The way the circuit was be placed and could be interacted with was informed by the overall form the paper was folded into. 
  • The windmill design is constructed out of 8 equally shaped square pieces of paper. Half of the squares make up the base. The four remaining pieces are folded into the shapes that should construct the pinwheel. First, they are folded diagonally to create a triangle. I remembered that one of the points of the triangle needed to be folded up. What I did not remember was which point needed to be folded. Looking at my finished paper circuit design, I knew something was not exactly pinwheel-y about it. Writing this post and juxtaposing the picture of my paper circuit and the picture of my fabric pinwheel that revealed the trick. Since the fold should be visible, it matters which point is folded up! Documenting my process, a-ha moments, and overall project work on the initially blank canvas allowed me to reflect on my design activity and to make new connections (Chapman, 2009). 

  • When making my circuit, I was not alone. I crafted and debugged along all of the other course participants who were working on their own interpretations of the assignment. One of the other participants, Joey, created a layered card design. What stood out in her design was how she used the bendable properties of the conductive tape to twist the paper into waves that looked like the branches of a tree. I only recognized what she had been working on after both of us had finished when we chatted, took pictures, and explored each others' projects. This interaction made me reflect about my own process, and how individualized my approach had been until the very last minutes of the time spent at the makerspace. Staying longer in the creative environment of the makerspace might have helped elaborate these initial seeds of joining in and collaborating that so important for constructionist learning environments (e.g., Rusk, Resnick, & Cooke, 2009). I wonder what could have become of both of our projects if we had teamed up or worked off of each other's ideas. 
References

  • Chapman, R. (2009). Encouraging Peer Sharing: Learning Reflections in a Community of Designers. The computer clubhouse: Constructionism and creativity in youth communities, 81-89
  • Papert, S., & Harel, I. (1991). Situating constructionism. Constructionism, 36, 1-11.
  • Rusk, N., Resnick, M., & Cooke, S. (2009). Origins and guiding principles of the computer clubhouse. The computer clubhouse: Constructionism and creativity in youth communities, 17-25.